Nodejs简介
以下引自 Node.js 官网:
不是编程语言
也不是框架和库
是一个 JavaScript 运行时(环境)
 能解析和执行 JavaScript 代码(严格来说应该是 ECMAScript 代码)
构建于 Chrome V8 JavaScript 引擎之上
为 JavaScript 提供了服务端编程的能力

 文件 IO

 网络 IO
从技术角度它的能力和 Java、PHP、Python、Perl、Ruby 等服务端技术类似
Node 的特点
事件驱动
非阻塞 IO(异步) 模型
单线程
跨平台
Node 的运行机制
多线程处理机制:
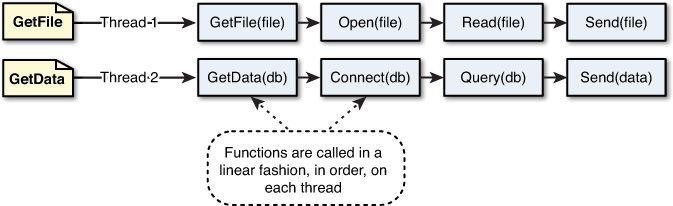
Web 服务器(Apache、Tomcat、IIS):
请求进来
Web 服务器开启一个线程来处理用户请求
同一时间有 n 请求,服务器就需要开启 n 个线程

 一个线程最少得消耗 8MB 内存

 对于一个 8GB 内存的服务器来说,它能应对的并发数是 1024 * 8 / 8 = 1024 个并发
事件驱动处理模型:
Node 中低层封装了一堆的异步操作 API
 文件操作
 网络操作
 ...
JavaScript 语言本身是单线程的

模块通信规则
require 模块导入
1 | // 核心模块 |
require内部处理流程
- 检查Module._cache是够缓存到了指定模块
- 如果缓存没有的话,就创建一个新的module实例将他保存到缓存
- module.load()加载指定模块
- 在解析的过程中如果发生异变,仓缓存中删除该模块
- 返回该模块的moudule.exprots
exports 模块导出
1 | // 导出多个成员:写法一 |
exports 和 module.exports 的区别
exports 和 module.exports 的区别
每个模块中都有一个 module 对象
module 对象中有一个 exports 对象
我们可以把需要导出的成员都挂载到 module.exports 接口对象中
也就是:moudle.exports.xxx = xxx 的方式
但是每次都 moudle.exports.xxx = xxx 很麻烦,点儿的太多了
所以 Node 为了你方便,同时在每一个模块中都提供了一个成员叫:exports
exports === module.exports 结果为 true
所以对于:moudle.exports.xxx = xxx 的方式 完全可以:expots.xxx = xxx
当一个模块需要导出单个成员的时候,这个时候必须使用:module.exports = xxx 的方式
不要使用 exports = xxx 不管用
因为每个模块最终向外 return 的是 module.exports
而 exports 只是 module.exports 的一个引用
所以即便你为 exports = xx 重新赋值,也不会影响 module.exports
但是有一种赋值方式比较特殊:exports = module.exports 这个用来重新建立引用关系的
之所以让大家明白这个道理,是希望可以更灵活的去用它
文件操作
fs模块
| API | 作用 | 备注 |
1 | fs.access(path, callback) 判断路径是否存在 |
path 模块
参考文档:https://nodejs.org/dist/latest-v9.x/docs/api/path.htmlpath 是 Node 本身提供的一个核心模块,专门用来处理路径。
使用它的第一步就是先加载:
1 | const path = require("path"); |
path.basename
获取一个路径的文件名部分
1 | path.basename("/foo/bar/baz/asdf/quux.html"); |
path.dirname
获取一个路径的目录部分
1
2 path.dirname("/foo/bar/baz/asdf/quux");
// Returns: '/foo/bar/baz/asdf'
path.extname
获取一个路径的后缀名部分
1 | path.extname("index.html"); |
Node + express
Express 介绍
Express 是一个基于 Node.js 平台,快速、开放、极简的 web 开发框架。 它可以轻松构建各种web应用,例如:
接口服务
传统的web网站
开发工具集成等(例如webpack的devServer)
Express本身是极简的,仅仅提供了web开发的基础功能,但是它通过中间件的方式集成了许许多多的外部插件来处理HTTP请求。
body-parser:解析HTTP请求体
compression:压缩HTTP响应
cookie-parser:解析cookie 数据
cors:处理跨域资源请求
morgan:HTTP请求日志记录
Express中间件的特性固然强大,但是它所提供的灵活性是一把双刃剑。
它让Express本身变得更加灵活和简单
缺点在于虽然有一些中间件包可以解决几乎所有问题或需求,但是挑选合适的包有时也会成为一个挑战
有很多流行框架基于 Express
Express 官网
express 安装
参考文档:http://expressjs.com/en/starter/installing.html
1
2
3
4
5
6
7
8
9 # 创建并切换到 myapp 目录
mkdir myapp
cd myapp
# 初始化 package.json 文件
npm init -y
# 安装 express 到项目中
npm i express
Hello World
1 | // 0. 加载 Express |
nodejs + express + mysql
mysql 配置
MySQL 安装与配置
1
2
3
4
5
6
7
8下载
https://dev.mysql.com/downloads/installer/
安装
https://dev.mysql.com/doc/refman/8.0/en/mysql-installer.html
https://dev.mysql.com/doc/refman/8.0/en/osx-installation-pkg.html
https://dev.mysql.com/doc/refman/8.0/en/linux-installation.html
node中使用mysql
安装node包(mysql)
1 | npm install mysql |
连接mysql
1 | //新建一个db.js |
增
1 | const db = require("../db");//链接db.js |
删
1 | const db = require("../db") |
改
1 | const content = req.body |
查
1 | //获取全部 |
jwt登录 注册
安装 jwt node包
1 | npm i jsonwebtoken |
使用jwt
utils中新建jwt.js 内容如下
1
2
3
4
5
6
7
8
9
10
11
12
13
14
15
16
17
18
19
20
21
22
23
24
25
26
27
28 const jwt = require('jsonwebtoken')
const jwtKey = 'junkaicool' // token生成的密匙
const jwtSign = (data) => { // token生成函数,有效时间为一个小时
const token = jwt.sign(data, jwtKey, {expiresIn:60*60})
return token
}
const jwtCheck = (req, res, next) => { // token验证函数
const token = req.headers.token
jwt.verify(token, jwtKey, (err, data) => {
if (err) {
res.send({
code: '99999999',
msg: 'token无效'
})
} else {
req.jwtInfo = data
next()
}
})
}
module.exports = {
jwtSign,
jwtCheck
}
login配置
新建login.js 内容如下
1 | const { jwtSign } = require("../../utils/jwt"); |
注册
新建register.js 内容如下
1
2
3
4
5
6
7
8
9
10
11
12
13
14
15
16
17
18
19
20
21
22
23
24
25
26
27register(req,res){
const data = req.body // 获取数据(要配置中间件来解析数据 否则显示undefind)
const sql = 'insert into user set ?' // 构建sql语句
// 执行sql语句
db.query('select * from user', (err, list) => {
if (err) return console.log(err.message);
var m =lodash.findIndex(list, function(o) { return o.username == data.username; })
if (m >= 0) {
res.send({
code: 201,
message: "该用户已存在"
})
} else {
db.query(sql, data, (err, data) => {
if (err) return console.log(err.message); // 判断sql是否执行失败
// 判断数据是否插入成功 看affectedRows的值是否为1,不为1则写入失败
if (data.affectedRows !== 1) return console.log('数据写入失败');
// 否则写入成功 返回客户端
res.send({
code: 200,
msg: '添加成功'
})
})
}
})
},
nodejs 上传图片
安装
1
npm i multer
新建multer.js 内容如下
1
2
3
4
5
6
7
8
9
10
11
12
13
14
15
16
17
18
19
20
21
22
23
24
25
26
27
28
29
30
31
32
33
34
35
36
37
38
39
40
41
42 // 1. 引入依赖
const multer = require('multer');
// const md5 = require('md5');
// 2. 引入工具
const path = require('path') //
const resolve = (dir) => {
return path.join(__dirname, './', dir)
}
var fileFormat = ""
// 3. multer的配置对象
let storage = multer.diskStorage({
// 3.1 存储路径
destination: function (req, file, cb) {
// 3.1.1 允许图片上传
if (file.mimetype === 'image/jpeg' || file.mimetype === 'image/png') {
cb(null, resolve('../public/headers'))
} else {
// 3.1.2 限制其他文件上传类型
cb({ error: 'Mime type not supported' })
}
},
// 3.2 存储名称
filename: function (req, file, cb) {
// fileFormat = (file.originalname).split(".");//图片名称
fileFormat = file.originalname
// cb(null,fileFormat+ "." + fileFormat[fileFormat.length - 1]);
cb(null,fileFormat);
},
});
// 4. 添加配置
const multerConfig = multer({
storage: storage,
});
// 5. 导出配置好的multerConfig
module.exports ={
multerConfig,
fileFormat
}
获取图片路径 新建upload.js 内容如下
1
2
3
4
5
6
7
8
9
10
11
12
13
14
15
16
17
18
19
20
21
22
23
24
25
26// 1. 引入配置好的multerConfig
const mutlter = require('./multer');
// 2. 定义静态变量
const fileName = "photo" // 上传的 fileName 名称
const updateBaseUrl = "http://localhost:3099" // 上传到服务器地址
const imgPath = "/public/headers/" // 上传到的虚拟目录
// 上传接口的 请求参数req 响应参数res
function upload(req, res) {
return new Promise((resolve, reject) => {
mutlter.multerConfig.single(fileName)(req, res, function (err) {
if (err) {
reject(err)
} else {
// `req.file.filename` 请求文件名称后缀
// `updateBaseUrl + imgPath + req.file.filename` 完整的服务器虚拟目录
// console.log(updateBaseUrl,imgPath,req.file.filename)
resolve(updateBaseUrl + imgPath + req.file.filename)
}
});
})
}
module.exports = upload;
设置请求接口
1
2
3
4
5
6
7
8
9
10
11
12
13 router.post('/upload', (req, res) => {
upload(req, res).then(imgsrc => {
// 上传成功 存储文件路径 到数据库中
// swq sql需要修改一下,变成新增,这里测试暂用更新
res.send({
code:200,
message:"上传成功",
imgurl:imgsrc
})
})
})
nodejs 设置图片验证码
安装第三方工具
1 | npm i svg-captcha |
新建passport.js 内容如下
1 | var svgCaptcha = require('svg-captcha'); |